Appearance
Translate
eWizard allows you to translate texts of your content items directly in Editor manually and automatically. You can also export the content item texts to an XLIFF or XLSX file and localize them externally.
Contact the administrator to configure content translation with the eVa AI Translate agent. The AI-driven agent uses documents and style guide rules from your knowledge base to support the automatic translation service.
To translate the content item text manually:
Set the language for the content item translation:
Open the content item in Editor.
Click
TRANSLATEon the modes panel.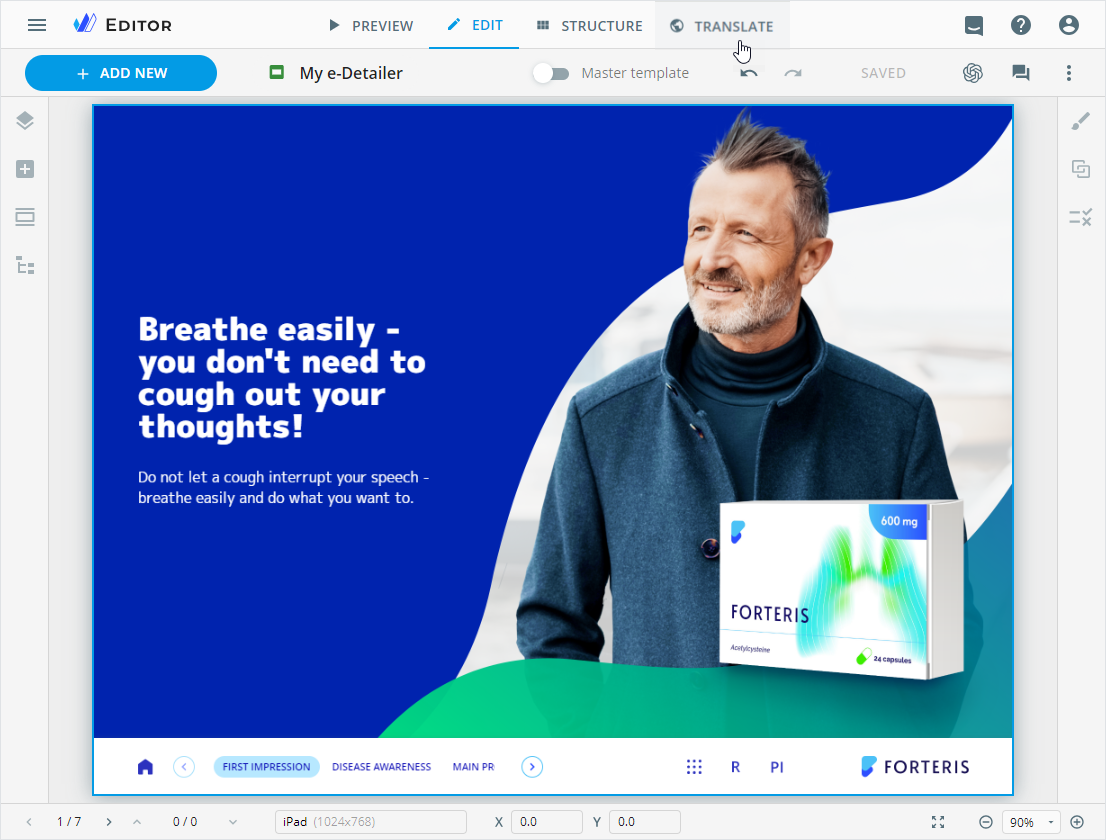
The content item layout in the TRANSLATE mode comprises the following working areas:
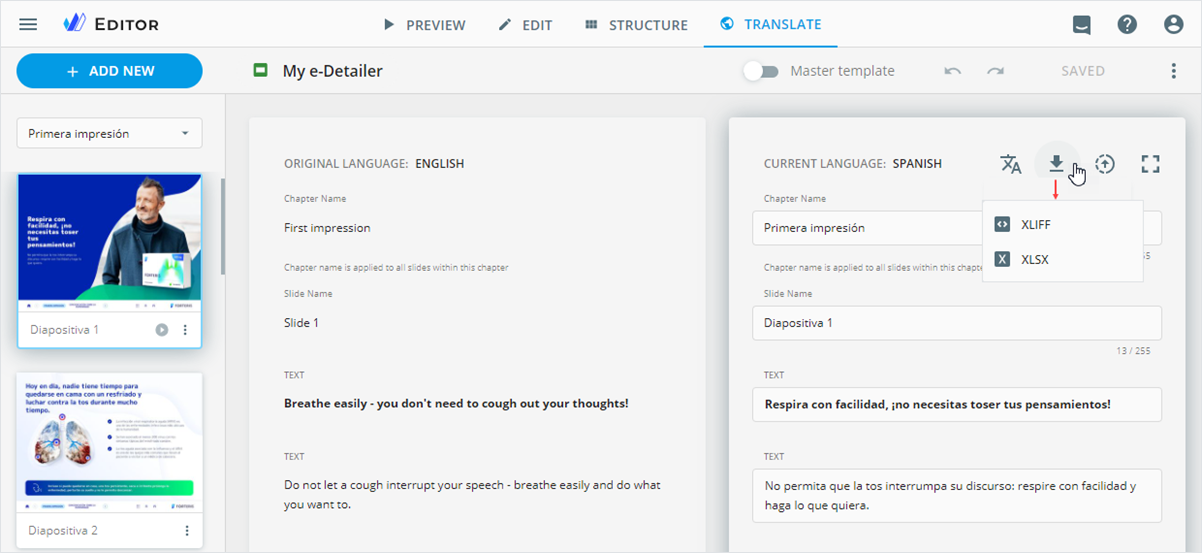
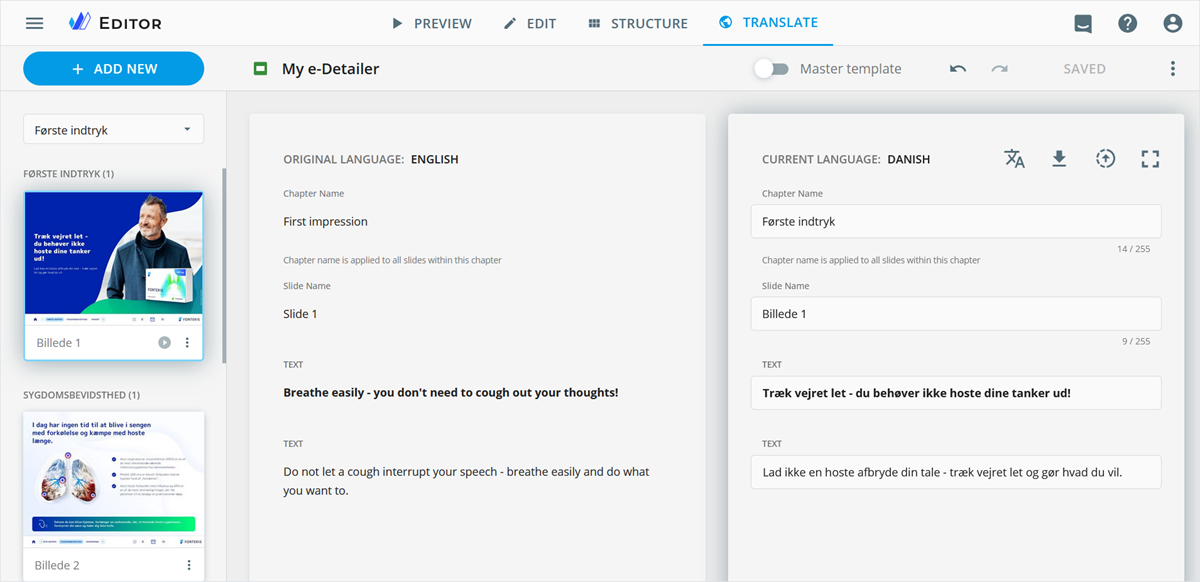
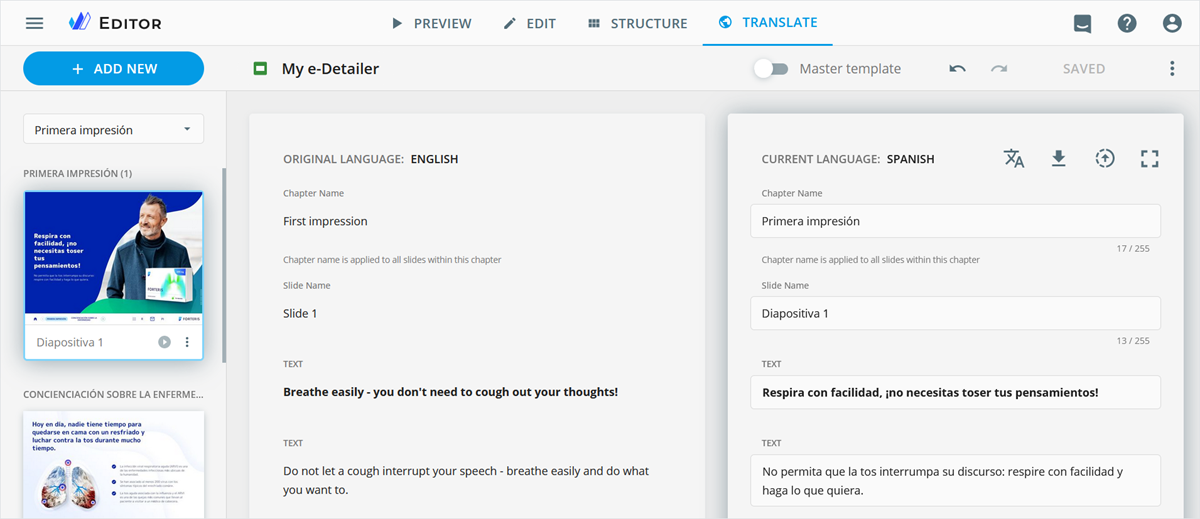
[1] ORIGINAL LANGUAGE area with the source text in the original language. By default, the original language in eWizard is English.
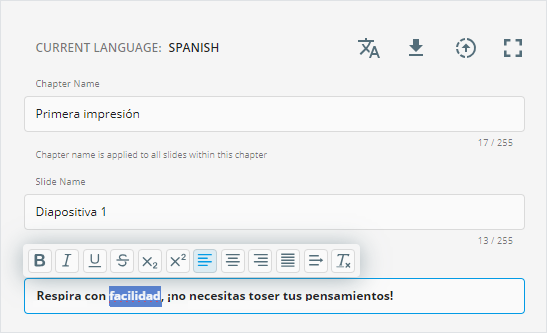
[2] CURRENT LANGUAGE area with the text in the original language that you are to translate into the target language.
When you translate the same content item into a new language, the current language becomes the original one. And the newly set language is used as the current one.
In the CURRENT LANGUAGE area, you can use the following controls:
| Control | Action |
|---|---|
| Auto translate the content item text | |
| Download the content item text for the external translation as an XLIFF or XLSX file | |
| Upload the translated XLIFF or XLSX file to update the content item text | |
| Hide the original text |
The text in the TRANSLATE mode is displayed without the text color, highlight, and shadow formatting applied to it in the EDIT mode.
To change the content item text in the CURRENT LANGUAGE area:
- Place the mouse cursor to the required text string.
The inline editor appears.
Enter your translation and edit its formatting if required.
Adding or deleting the content item text in the
CURRENT LANGUAGEarea doesn't affect the source text.Save changes.
Open the
EDITmode to see the applied changes on the content item layout.
e-Detailers / e-Detailer briefs / multipage sites
When translating the item text in the CURRENT LANGUAGE area, find the updated chapter, slide names for e-Detailers, and page names for multipage sites in the left sidebar.
To translate all common texts and footnotes of your content item at once, switch the Master template toggle on.
Rep-triggered emails and their briefs
If the translated content item exceeds the character limit for the resulting interactive document in VVPM, a warning message appears to notify you of potential rendering issues in email clients. This warning is triggered when:
To translate the required content item with collaborators, assign the Translator role to them.
Send for localization
In the TRANSLATE mode, you can download the content item text as an XLIFF or XLSX file for the external translation. Then upload the translated file to update your eWizard item.
To download the XLIFF/XLSX file with the content item text:
Click
 in the
 CURRENT LANGUAGEarea.Select the required file format—XLIFF or XLSX.
In the
Content languagepopup that appears, theLanguagefield is prepopulated with the language stated in theORIGINAL LANGUAGEarea. If this value differs from your e-Detailer language, select the proper one from the dropdown list.Contact your administrator to add or remove languages.
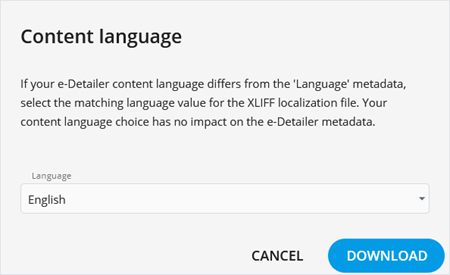
Click
DOWNLOAD.The resulting XLIFF file is generated in version 1.2 of the standard. To translate this file, select a machine translation system with XLIFF 1.2 support.
Automatically translate the XLIFF/XLSX file with third-party machine translation systems.
OR
Open the XLIFF/XLSX file on your device and enter the translation manually:
- Into the
targetstrings of the XLIFF file.
Email
If your email contains text merge tags with custom values used in Veeva Vault PromoMats, you can view and translate these values in the respective
targetstrings of the XLIFF file.- Into the
Target languagecolumn of the XLSX file.
e-Detailers / e-Detailer briefs / multipage sites
The text strings appear within the chapters, slides for e-Detailers, and pages for multipage sites they belong to.
If your content item contains common text and footnotes, you can view and translate them in the respective sections of the XLSX file.
For the proper content item display in eWizard Editor:
Maintain the order of text strings when translating.
Keep the applied tags without changes. However, you can translate custom values of text merge tags used in Veeva Vault PromoMats within XLIFF files.
Save the manually translated file.
- Into the
Once the translation is complete:
Open the required content item in the
TRANSLATEmode.Click
 in the
 CURRENT LANGUAGEarea to upload the XLIFF/XLSX file with the translated text.XLIFF file
When you upload the XLIFF file for translation, eWizard detects ISO 639-2, ISO 639-3 language codes, and BCP 47 language tags and converts them into two-letter language codes, ensuring seamless file uploads.
- Select the required file on your device.
XLIFF files translated in third-party systems might not be recognized by eWizard due to different file structure.
The imported file automatically updates the eWizard item with the translated text and changes its version.
XLIFF file
If the target language of the XLIFF file differs from the current language of the content item, you can still upload the XLIFF file. As a result, the translation from the XLIFF file overwrites the text in the CURRENT LANGUAGE area.
Rep-triggered emails and their briefs
If the translated content item exceeds the character limit for the resulting interactive document in VVPM, a warning message appears to notify you of potential rendering issues in email clients. This warning is triggered when:
Auto translate
You can automatically translate your e-Detailer, email, and website content to and from available languages in the Editor TRANSLATE mode.
Contact the administrator to configure content translation with the eVa AI Translate agent. The AI-driven agent uses documents and style guide rules from your knowledge base to support the automatic translation service.
To auto translate text:
Click
 in the
 CURRENT LANGUAGEarea.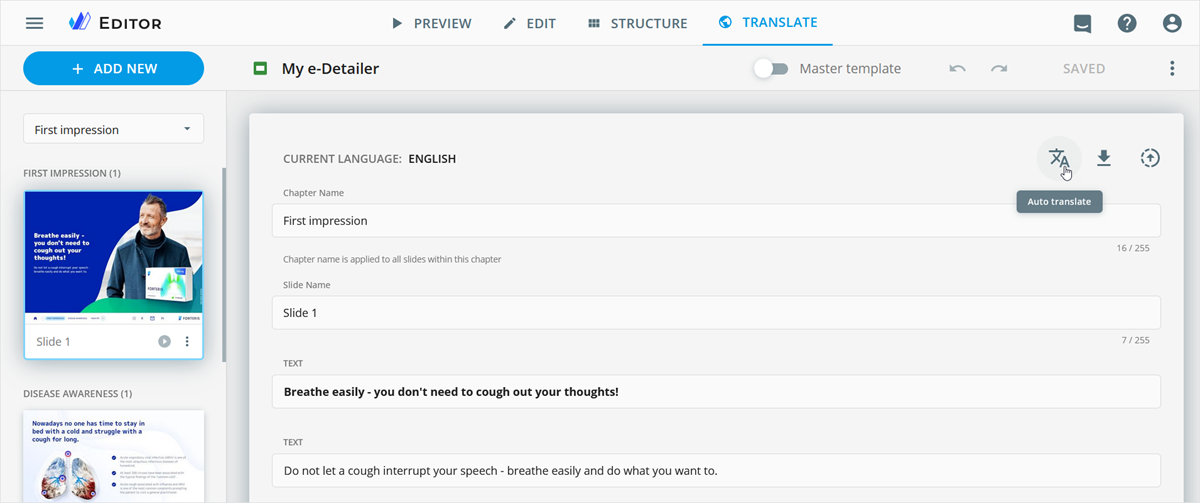
In the
Tofield, select the target language for the text translation from the dropdown list.The
Fromfield is prepopulated with the language stated in theORIGINAL LANGUAGEarea. If this value differs from your item language, select the proper one from the dropdown list.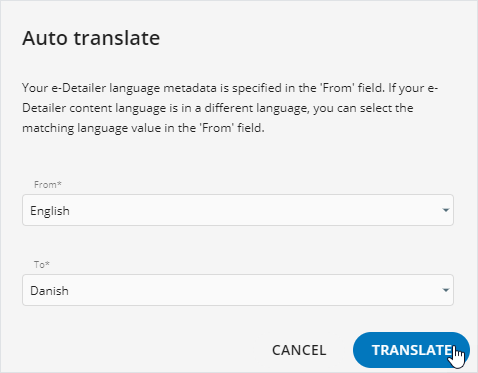
You can select
Auto-detectfor eWizard to identify the content language and ensure the correct translation result.
Click
TRANSLATE.
As a result, the current language becomes the original one. The target language is used as the current one.
Auto translation is machine-generated and may contain inaccuracies and formatting issues. Please review the translation carefully and correct any errors directly in the translated text lines or switch to the EDIT mode.
You can manually edit the auto translated text and add new text in the CURRENT LANGUAGE area. The total number of characters in translated subjects mustn't exceed 1500.
By default, the source text and the original language remain unchanged after the translation. For example, after you apply the Auto translate option and select Spanish as the target language, the current language becomes SPANISH, and the original language stays the same—ENGLISH.
Rep-triggered emails and their briefs
If the translated content item exceeds the character limit for the resulting interactive document in VVPM, a warning message appears to notify you of potential rendering issues in email clients. This warning is triggered when:
Available languages
The list of available languages might differ on your instance. Contact your administrator to add or remove languages.
You can auto translate to and from the following languages in Editor and Viewer:
| Language | ISO 639-2 code | Language | ISO 639-2 code | Language | ISO 639-2 code |
|---|---|---|---|---|---|
| Afrikaans | afr | German | deu | Pashto | pus |
| Albanian | sqi | Greek | ell | Polish | pol |
| Amharic | amh | Gujarati | guj | Portuguese (Brazil) | por |
| Arabic | ara | Haitian Creole | hat | Portuguese (Portugal) | por |
| Armenian | hye | Hausa | hau | Punjabi | pan |
| Azerbaijani | aze | Hebrew | heb | Romanian | ron |
| Bengali | ben | Hindi | hin | Russian | rus |
| Bosnian | bos | Hungarian | hun | Serbian | srp |
| Bulgarian | bul | Icelandic | ice | Sinhala | sin |
| Catalan | cat | Indonesian | ind | Slovak | slk |
| Chinese (Simplified) | zho | Irish | gle | Slovenian | slv |
| Chinese (Traditional) | chi | Italian | ita | Somali | som |
| Croatian | hrv | Japanese | jpn | Spanish | spa |
| Czech | ces | Kannada | kan | Spanish (Mexico) | spa |
| Danish | dan | Kazakh | kaz | Swahili | swa |
| Dari | fas | Korean | kor | Swedish | swe |
| Dutch | nld | Latvian | lav | Tamil | tam |
| English | eng | Lithuanian | lit | Telugu | tel |
| Estonian | est | Macedonian | mkd | Thai | tha |
| Farsi (Persian) | fas | Malay | may | Turkish | tur |
| Filipino (Tagalog) | tgl | Malayalam | mal | Ukrainian | urk |
| Finnish | fin | Maltese | mlt | Urdu | urd |
| French | fra | Marathi | mar | Uzbek | uzb |
| French (Canada) | fre | Mongolian | mon | Vietnamese | vie |
| Georgian | kat | Norwegian (Bokmål) | nor | Welsh | wel |