Appearance
Navigation
The navigator module ensures navigation in e-Detailers and surveys. Navigation means transition between slides, subslides, and chapters when you swipe the slides. Use the settings.json file to define the navigation settings.
The navigator module includes the transition hooks that activate certain transition effects, animation, CSS, and other actions when you enter or leave a slide.
The navigator module uses the standard slide demonstration flow defined in the structure.json file. You can create a new demonstration flow dynamically while viewing an e-Detailer.
The navigation instance is bound to the instance of Vue as $navigator. You have access to the navigation plugin and its methods via this context on a slide.
js
this.$navigatorThe navigation API has the following methods for navigating to the specific slides in your e-Detailer.
goTo
The goTo method opens the slide that you define in the options parameter for this method. You can call this method on any slide of your e-Detailer using this context.
js
this.$navigator.goTo(options, force);The options parameter is required. The force parameter is optional.
The goTo method has the following parameters:
options(Object) is the required parameter that includes the following fields:slide(String) specifies the ID of the slide to navigate.chapter(String) specifies the ID of the chapter to which the slide belongs.presentation(String) specifies the ID of the e-Detailer to navigate; available only in the Veeva CRM and Platforce CLM builds. For Platforce CLM, specify the e-Detaileridas thepresentationfield value. For example,presentation: "my-edetailer". See e-Detailer settings for Platforce CLM.animation(Boolean) defines if the slide's transition animation is played during the navigation (true) or skipped (false). Defaults totrue.
force(Boolean) is the optional parameter. Specifies if the navigation lock is ignored. Defaults tofalse.The force option can be useful if the navigation to the neighboring slide is locked but you still need to execute the navigation to this slide.
To use the goTo method on a slide, add this code to your slide instance.
html
<!-- ./slides/goTo/index.vue -->
<template>
    <div class="layout">
        <button @click="goToLastSlide">Go to the last slide</button>
    </div>
</template>
js
// ./slides/goTo/index.vue
export default {
    methods: {
        goToLastSlide() {
            const options = {
                slide: "outsideClick",
                chapter: "actions",
                animation: true
            };
            this.$navigator.goTo(options);
        },
    },
};
This code adds the HTML button to your slide. Click the Go to the last slide button on the slide to call the goTo method. The method executes navigation to the slide that you define in the options parameter.
goToNextSlide
The goToNextSlide method opens the next slide of your e-Detailer. If the subslide option is set to true, the next subslide opens. You can call this method on any slide of your e-Detailer using this context.
js
this.$navigator.goToNextSlide(force, { subslide: true })The force and subslide parameters are optional.
The goToNextSlide method has the following parameters:
force(Boolean) is the optional parameter. Specifies if the navigation lock is ignored. Defaults tofalse.The force option can be useful if the navigation to the neighboring slide is locked but you still need to execute the navigation to this slide.
subslide(Object) is the optional parameter. If thesubslideoption is set totrue, the next subslide opens. Defaults totrue.
To use the goToNextSlide method on a slide, add this code to your slide instance.
html
<!-- ./slides/goTo/index.vue -->
<template>
    <div class="layout">
        <button @click="goToNextSlide">Go to the next slide</button>
    </div>
</template>
js
// ./slides/goTo/index.vue
export default {
    methods: {
        goToNextSlide() {
            this.$navigator.goToNextSlide();
        },
    },
};
This code adds the HTML button to your slide. Click the Go to the next slide button on the slide to call the goToNextSlide method. The method executes navigation to the next slide of your e-Detailer.
goToPrevSlide
The goToPrevSlide method opens the previous slide of your e-Detailer. If the subslide option is set to true, the previous subslide opens. You can call this method on any slide of your e-Detailer using this context.
js
this.$navigator.goToPrevSlide(force, { subslide: true })The force and subslide parameters are optional.
The goToPrevSlide method has the following parameters:
force(Boolean) is the optional parameter. Specifies if the navigation lock is ignored. Defaults tofalse.The force option can be useful if the navigation to the neighboring slide is locked but you still need to execute the navigation to this slide.
subslide(Object) is the optional parameter. If thesubslideoption is set totrue, the previous subslide opens. Defaults totrue.
To use the goToPrevSlide method on a slide, add this code to your slide instance.
html
<!-- ./slides/open/index.vue -->
<template>
    <div class="layout">
        <button @click="goToPreviousSlide">Go to the previous slide</button>
    </div>
</template>
js
// ./slides/open/index.vue
export default {
    methods: {
        goToPreviousSlide() {
            this.$navigator.goToPrevSlide();
        },
    },
};
This code adds the HTML button to your slide. Click the Go to the previous slide button on the slide to call the goToPrevSlide method. The method executes navigation to the previous slide of your e-Detailer.
goToNextChapter
The goToNextChapter method opens the next chapter of your e-Detailer. You can call this method on any slide of your e-Detailer using this context.
js
this.$navigator.goToNextChapter(force)The force (Boolean) is the optional parameter. It specifies if the navigation lock is ignored. Defaults to false.
The force option can be useful if the navigation to the neighboring slide is locked but you still need to execute the navigation to this slide.
To use the goToNextChapter method on a slide, add this code to your slide instance.
html
<!-- ./slides/goTo/index.vue -->
<template>
    <div class="layout">
        <button @click="goToNextChapter">Go to the next chapter</button>
    </div>
</template>
js
// ./slides/goTo/index.vue
export default {
    methods: {
        goToNextChapter() {
            this.$navigator.goToNextChapter();
        },
    },
};
This code adds the HTML button to your slide. Click the Go to the next chapter button on the slide to call the goToNextChapter method. The method executes navigation to the next chapter of your e-Detailer.
goToPrevChapter
The goToPrevChapter method opens the previous chapter of your e-Detailer. You can call this method on any slide of your e-Detailer using this context.
js
this.$navigator.goToPrevChapter(force)The force (Boolean) is the optional parameter. It specifies if the navigation lock is ignored. Defaults to false.
The force option can be useful if the navigation to the neighboring slide is locked but you still need to execute the navigation to this slide.
To use the goToPrevChapter method on a slide, add this code to your slide instance.
html
<!-- ./slides/goTo/index.vue -->
<template>
    <div class="layout">
        <button @click="goToPreviousChapter">Go to the previous chapter</button>
    </div>
</template>
js
// ./slides/goTo/index.vue
export default {
    methods: {
        goToPreviousChapter() {
            this.$navigator.goToPrevChapter();
        },
    },
};
This code adds the HTML button to your slide. Click the Go to the previous chapter button on the slide to call the goToPrevChapter method. The method executes navigation to the previous chapter of your e-Detailer.
goToNextSubslide
The goToNextSubslide method opens the next subslide of your e-Detailer. You can call this method on any slide of your e-Detailer using this context.
js
this.$navigator.goToNextSubslide()This method has no parameters.
To use the goToNextSubslide method on a slide, add this code to your slide instance.
js
// ./slides/open/index.vue
export default {
    methods: {
        goToNextSubslide() {
            this.$navigator.goToNextSubslide();
        },
    },
};
goToPrevSubslide
The goToPrevSubslide method opens the previous subslide of your e-Detailer. You can call this method on any slide of your e-Detailer using this context.
js
this.$navigator.goToPrevSubslide()This method has no parameters.
To use the goToPrevSubslide method on a slide, add this code to your slide instance.
js
// ./slides/open/index.vue
export default {
    methods: {
        goToPrevSubslide() {
            this.$navigator.goToPrevSubslide();
        },
    },
};
hasNextSubslide
The hasNextSubslide method checks if there is a next subslide available in the current slide. You can call this method on any slide of your e-Detailer using this context.
js
this.$navigator.hasNextSubslide()The hasNextSubslide method returns a Boolean value:
trueif a next subslide is available.falseif a next subslide is not available.
hasPrevSubslide
The hasPrevSubslide method checks if there is a previous subslide available in the current slide. You can call this method on any slide of your e-Detailer using this context.
js
this.$navigator.hasPrevSubslide()The hasPrevSubslide method returns a Boolean value:
trueif a previous subslide is available.falseif a previous subslide is not available.
openDocument
The openDocument method opens the file defined in the path parameter. You can call this API method on any slide using this context.
js
this.$navigator.openDocument(path);The path parameter is required. Its type is String.
To use the openDocument method, add this code to your slide instance.
js
// ./slides/slider2/index.vue
export default {
created() {
this.$navigator.openDocument('./e-Detailer.pdf');
},
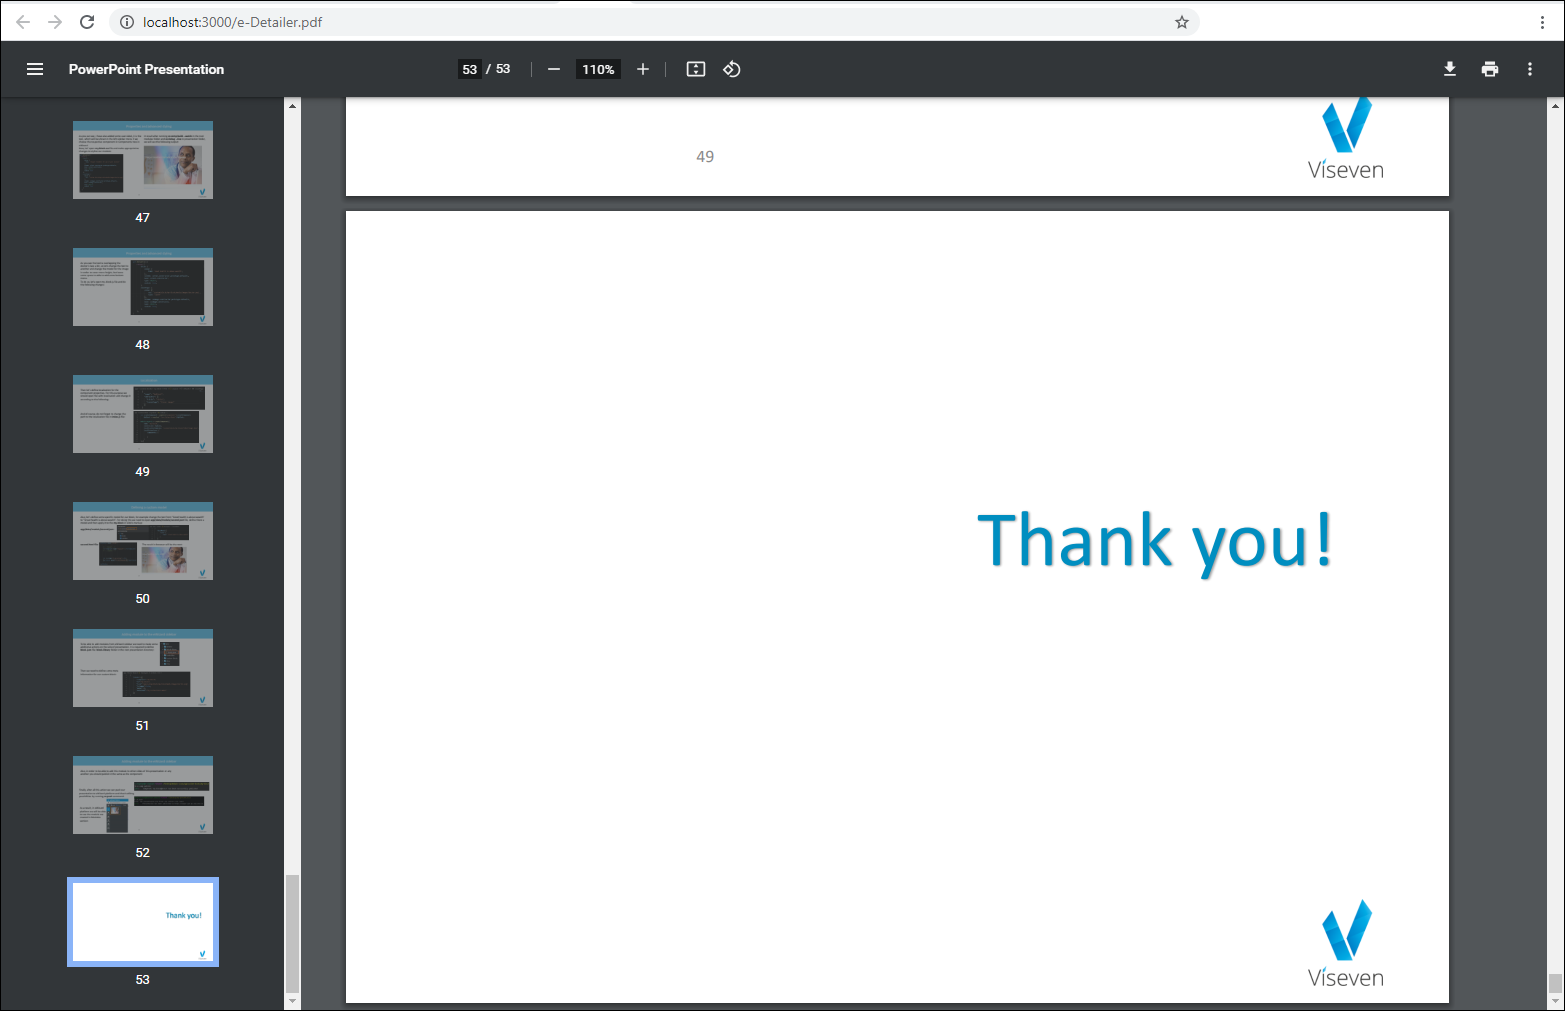
};The openDocument method opens the file located as defined in the path parameter. A PDF file opens in a new browser tab as a PowerPoint presentation compatible with CLMs.
The openDocument method opens the files that have the formats supported by your browser. If your browser doesn't support viewing the file format, the download dialog opens. You can download the file to your computer and open it with the dedicated app.
You can use hyperlinks as the path parameter. The link opens in a new browser tab.
js
// ./slides/slider2/index.vue
export default {
    created() {
        this.$navigator.openDocument('https://viseven.com/');
    },
};
The openDocument method executes when you navigate to the slide where this method is defined.
We recommended using the v-open directive with the pdf modifier instead of the openDocument method. Documents added through openDocument may be excluded from the final build and can't be edited in eWizard Editor.
openLink
The openLink method opens a link in a new browser tab. You can call this API method on any slide using this context.
js
this.$navigator.openLink(path);The path parameter is required. Its type is String.
To use the openLink method, add this code to your slide instance.
js
// ./slides/slider2/index.vue
export default {
    methods: {
        openLink() {
            this.$navigator.openLink('https://viseven.com/');
        },
    },
};
The openLink method opens the link in a new browser tab.
We recommended using the v-open directive with the link modifier instead of the openLink method. Links added through openLink can't be edited in eWizard Editor.
Locking the navigation
The navigator module provides the methods to restrict the navigation from the current slide. When you lock the navigation, you can't use the swipe gestures, the keyboard, or the navigation methods for navigating to any next or previous slide in your e-Detailer. To override the locked navigation, use the force parameter or the unlocking methods.
The following methods are available for locking and unlocking navigation.
lockNext()locks the navigation to any next slide.lockPrev()locks the navigation to any previous slide.lock()locks the navigation to any next and previous slides.unlockNext()unlocks the navigation to any next slide.unlockPrev()unlocks the navigation to any previous slide.unlock()unlocks the navigation to any next and previous slides.
To use the locking or unlocking methods on a slide, add this code to your slide instance.
html
<!-- ./slides/open/index.vue -->
<template>
    <div class="layout">
        <button @click="lockNextSlide">Lock any next slide</button>
        <button @click="lockPreviousSlide">Lock any previous slide</button>
        <button @click="lockAnySlide">Lock any slide</button>
        <button @click="unlockNextSlide">Unlock any next slide</button>
        <button @click="unlockPreviousSlide">Unlock any previous slide</button>
        <button @click="unlockAnySlide">Unlock any slide</button>
    </div>
</template>
js
// ./slides/open/index.vue
export default {
    methods: {
        lockNextSlide() {
            this.$navigator.lockNext();
        },
        lockPreviousSlide() {
            this.$navigator.lockPrev();
        },
        lockAnySlide() {
            this.$navigator.lock();
        },
        unlockNextSlide() {
            this.$navigator.unlockNext();
        },
        unlockPreviousSlide() {
            this.$navigator.unlockPrev();
        },
        unlockAnySlide() {
            this.$navigator.unlock();
        },
    },
};
This code adds the HTML buttons to your slide. Click the respective button on the slide to call the navigation locking or unlocking method. For example, click the Lock any next slide button to lock the navigation to any next slide in your e-Detailer. To unlock the navigation, click the Unlock any next slide button.
Navigation status
The navigator module provides the navigation status methods that:
Show if the navigation to the previous or next slide is locked.
Show IDs for the current/previous/next slide and chapter.
getNavigationStatus
Use the getNavigationStatus method to find out if the navigation to the previous or next slide is locked. You can call this API method on any slide of your e-Detailer using this context.
js
this.$navigator.getNavigationStatus();The getNavigationStatus method returns an object with the status values:
prevNavigationLocked(Boolean) indicates if the navigation to the previous slide is locked.nextNavigationLocked(Boolean) indicates if the navigation to the next slide is locked.
Consider the following example.
js
// ./slides/open/index.vue
export default {
mounted() {
this.$navigator.lockNext();
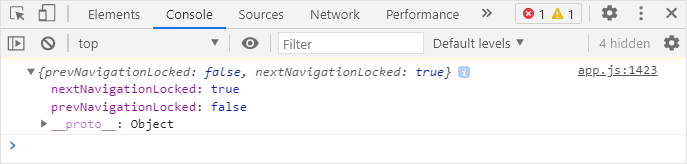
const getStatus = this.$navigator.getNavigationStatus();
console.log(getStatus);
},
};The returned result in the browser console:
getCurrentSlide
Use the getCurrentSlide API method to show the IDs for the current slide and chapter. You can call this API method on any slide of your e-Detailer using this context.
js
this.$navigator.getCurrentSlide();The getCurrentSlide method returns an object with the IDs for the current slide and chapter:
chapter(String) shows the current chapter ID.slide(String) shows the current slide ID.
Consider the following example.
js
// ./slides/open/index.vue
export default {
mounted() {
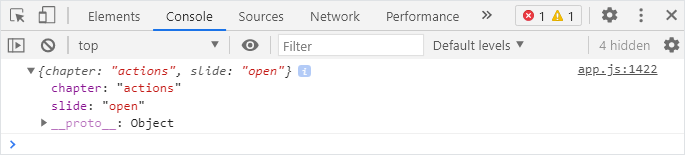
const getCurrentSlide = this.$navigator.getCurrentSlide();
console.log(getCurrentSlide);
},
};The returned result in the browser console:
Flow API
A flow means the order in which slides, subslides, and chapters are displayed in your e-Detailer. You can set the flow in the structure.json file. You can't change the e-Detailer structure when users view the e-Detailer. To change the slides order in the e-Detailer you can use custom flows. You can create a new demonstration flow dynamically by reusing the existing slides or subslides. This means that during the e-Detailer demonstration, only the slides from the new flow are displayed.
The navigator module provides the following API methods to work with flows.
setFlow
The setFlow method sets the new flow for displaying the slides in your e-Detailer. You can call this API method on any slide using this context.
js
this.$navigator.setFlow(structureFlow, goToOptions);The structureFlow and goToOptions are the required parameters for the setFlow method.
Parameters for setFlow
structureFlow(Array) is the collection of slides to form the new e-Detailer flow. Each slide in the array is an object with the following fields:slide(String) is the slide IDchapter(String) is the chapter ID
goToOptions(Object) defines the slide you're redirected to after creating the new flow; the object itself has the same fields as the goTo method options.
Usage of setFlow
To use the setFlow method on a slide, add this code to your slide instance.
html
<!-- ./slides/goTo/index.vue -->
<template>
    <div class="layout">
        <button @click="createFlow">Create a flow</button>
    </div>
</template>
js
// ./slides/goTo/index.vue
export default {
    methods: {
        createFlow() {
            const structureFlow = [{
                    slide: "open",
                    chapter: "actions"
                },
                {
                    slide: "toggle",
                    chapter: "actions"
                },
                {
                    slide: "switch",
                    chapter: "actions"
                }
            ];
            const goToOptions = {
                slide: "open",
                chapter: "actions"
            };
            this.$navigator.setFlow(structureFlow, goToOptions);
        },
    },
};
This code adds the HTML button to your slide. Click the Create a flow button on the slide to call the setFlow method. The method returns the new flow for displaying the slides. The navigation is now between the following slides: open, toggle, and switch. The first slide in the new flow is the open slide that you define in the goToOptions parameter.
resetFlow
The resetFlow method resets the current flow and defines the previous flow as current. If the previous flow doesn't exist, the structure.json file is used instead. You can call this API method on any slide using this context.
js
this.$navigator.resetFlow();The goToOptions is the optional parameter for the resetFlow method. Use this parameter if you want to open the specific slide when you reset the flow.
Usage of resetFlow
To use the resetFlow method on a slide, add this code to your slide instance.
html
<!-- ./slides/switch/index.vue -->
<template>
    <div class="layout">
        <button @click="resetFlow">Reset a flow</button>
    </div>
</template>
js
// ./slides/switch/index.vue
export default {
    methods: {
        resetFlow() {
            const goToOptions = {
                slide: "open",
                chapter: "actions"
            };
            this.$navigator.resetFlow(goToOptions);
        }
    }
};
This code adds the HTML button to your slide. Click the Reset a flow button on the slide to call the resetFlow method. This method resets the flow of slides to the previous flow or to the flow defined in the structure.json file. Your flow starts with the open slide because you define it in the goToOptions parameter.
You can create the flow within the already created one and fill it with other slides. In this case, you can return to the previous flow by using the resetFlow method.
reset
The reset method resets the current flow to the flow defined in the structure.json file. You can call this API method on any slide using this context.
js
this.$navigator.reset();The goToOptions is the optional parameter for the resetFlow method. Use this parameter if you want to open the specific slide when you reset the flow. Use the reset method in the same way you use the resetFlow method.
Navigation hooks
The navigator module provides the API methods in the form of hooks. All hooks are called with their this.$navigator context pointing to the Vue instance invoking it. Use the hooks to subscribe a function to the slide navigation events. With hooks, you can activate certain transition effects, animation, CSS, and other actions when you enter or leave a slide. You can add the hooks on any slide or component in e-Detailers.
The following hooks are available.
onbeforeenter(handler, options)registers the subscriber function executed each time when you open a slide, before the slide's transition animation starts.onenter(handler, options)registers the subscriber function executed each time when you open the slide, after the transition animation ends.onbeforeleave(handler, options)registers the subscriber function executed each time when you leave the current slide, before the slide transition animation starts.onleave(handler, options)registers the subscriber function executed each time when you leave the current slide, after the slide transition animation ends.
Hook parameters
Each hook method has the following parameters.
handler(Function) is the function that executes after the event publication. Thehandlerfunction returns the object with the IDs for the current chapter, slide, subslide, and the HTMLElement for the current slide.options(Object)global(Boolean) – iftrue, specifies that thehandlerfunction is registered as global. This means that the handler is invoked on each slide.
Usage of navigation hooks
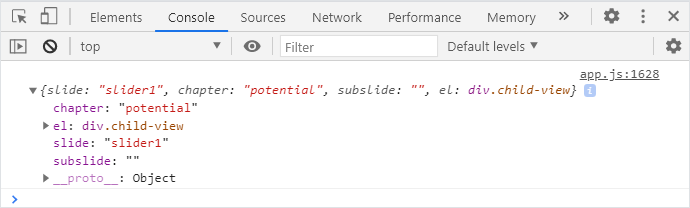
To use the navigation hooks, add the hook and its parameters to the slide instance. For example, add the onenter hook that accepts the navigation function as its parameter.
js
// ./slides/slider1/index.vue
export default {
    created() {
        this.$navigator.onenter(navigation => {
            console.log(navigation)
        }, );
    },
};
When you open the slide with this hook, the method returns this result in the browser console.
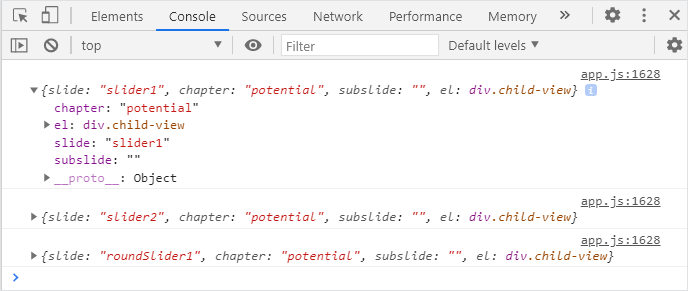
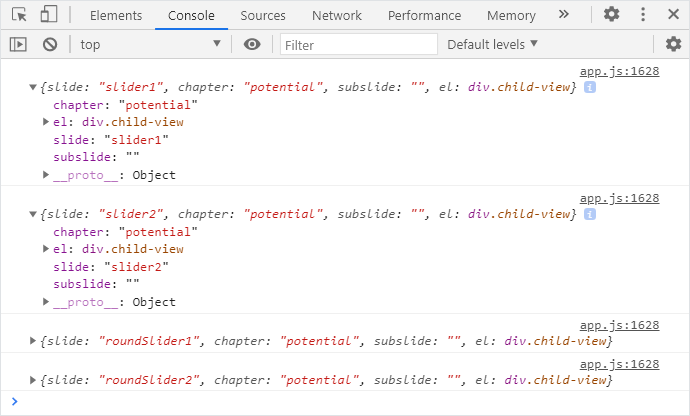
This hooks executes on the slide where you define it. To use this hook globally on every slide in your e-Detailer, add the global parameter with the true value.
js
// ./slides/slider1/index.vue
export default {
    created() {
        this.$navigator.onenter(navigation => {
            console.log(navigation)
        }, {
            global: true
        });
    },
};
When you open every slide of your e-Detailer, the method returns this result in the browser console.
To use the onleave hook on every slide in your e-Detailer, add this code to your slide instance.
js
// ./slides/slider1/index.vue
export default {
    created() {
        this.$navigator.onleave(navigation => {
            console.log(navigation)
        }, {
            global: true
        });
    },
};
When you leave the slide with this hook and open the next slide, the method returns the result for the previous slide in the browser console.