Appearance
Content icons
Content icons is a part of the INTERFACE section that allows you to customize how content item types are visually represented across services. By assigning display icons, you can make it easier for users to recognize and differentiate content item types in key eWizard services:
If your Business Admin is missing the Content icons configurations, contact eWizard Support for assistance.
To configure the content icons, go to INTERFACE ➝ Content icons.
Here, you can see the already added custom icons, if any, with the following data:
| Column | Description |
|---|---|
| Icon | Icon image thumbnail and a link to the icon details page. |
| Background | Background color and HEX color code of the content icon thumbnail to show in the dedicated eWizard services. |
| Condition | One or several rules defined for displaying an icon, based on parameters from the metadata fields. |
| Created | Date when the icon was added to Business Admin. |
| Updated | Date of the icon latest modification. |
In the table with the content icon records, you can do the following:
Sort the records by the creation or modification dates. For this, click the
CREATED/UPDATEDcolumn header. An arrow indicates the sorting direction: ascending or descending.Edit content icons. For this, click the
 button for the required record in the table.
Delete content icons. For this, click the
 button for the required record in the table.
You can also edit or delete the content icons on their details page. To go to the details page, click the link next to the icon image thumbnail in the records list.
Add new icon
To add a new content icon:
Click
 in the upper-right corner.
In the
Create iconpopup that appears, configure the following content icon parameters:
| Parameter | Description |
|---|---|
| Background | Set the content icon background color with a color picker. You can specify the background opacity in the respective input field. To remove the background color, click |
| Icon | Unfold the list of icons available in your eWizard toolkit and make your choice. If none of the icons match your requirements, ask your developers to add missing icons to the list. |
| Conditions: Path & Value | Add conditions based on system metadata to target the icon to the right content. Use |
Click
SAVEto add the new icon.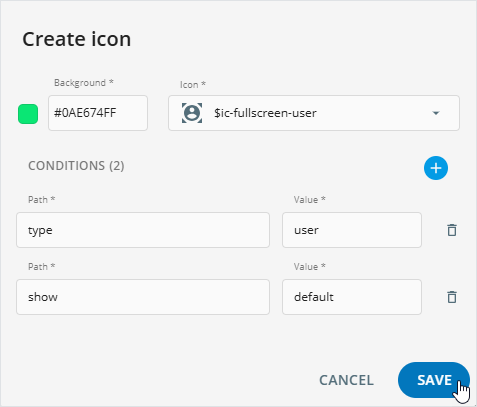
Once saved, the icon appears in the Planner, Editor, Library, and Viewer services as follows:
If the content you specified in the
CONDITIONSsettings already had a different icon, the new icon replaces it.If the icon is assigned to new content, it's applied immediately.